
Da ist mir doch Samstag eingefallen, dass ich heute was zu Star Wars gehäkelt haben wollte. Mist, verdammter!
Aber dafür, dass es „mal wieder“ eine total übereilte und schwachsinnige Aktion war, ist es nicht zuletzt dank der Hilfe meines Lieblingsmitbewohners ganz gut geworden. Dieser warf nämlich ein, dass Yoda häkeln langweilig, Prinzessin Leia boring und Jar Jar Bings fantechnisch zu hart wäre. Darth Vader wurde mir auch ausgequatscht, weil das nur mit Anakin gehen würde – auf den hatte ich aber keinen Bock etc. pp
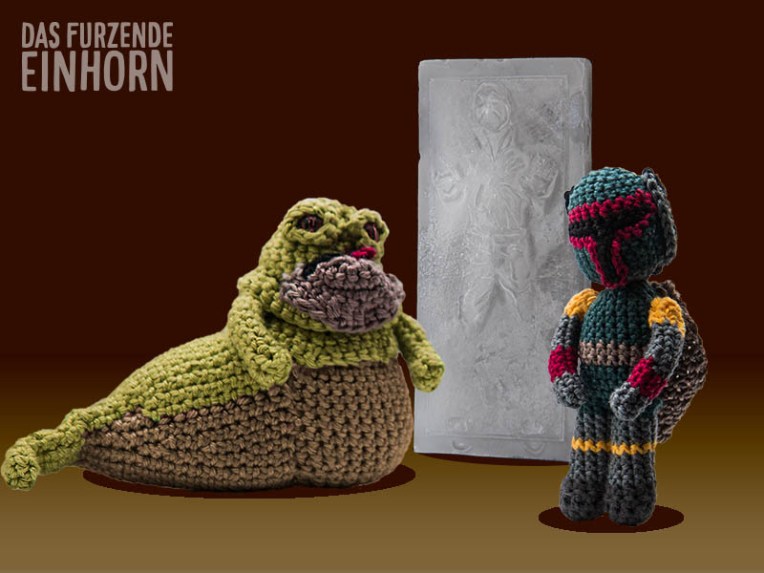
Wie ihr seht, sind wir nun bei einer Szene gelandet, die ich nicht einmal ansatzweise in Erinnerung hatte. Aber wofür gibt es die Google-Bildersuche. Für die Star-Wars-Gering-Enthusiasten unter uns: Jabba der Hutte (links), Han Solo in Karbonit (mitte) und Boba Fett (rechts). Alles Wissens- oder auch Nicht-Wissenswertes zu den Figuren erfahrt ihr unter der Verlinkung auf Jedipedia. Und ja, ich finde es auch bizarr, dass Star Wars nicht nur ein Wiki hat…
Zu Recht fragt ihr euch, warum ausgerechnet diese Szene den Zuschlag bekommen hat. Ich will es euch verraten: Seid geraumer Zeit liegt ein Han-Solo-in-Karbonit-Eiswürfelbereiter bei uns im Tiefkühlfach und damit hatte ich ohne viel Aufwand schon ein Motiv im Kasten… Konnte ja keiner ahnen, dass die dauernden Farbwechsel bei Boba und die vielen Doppelkinne von Jabba mich in den Wahnsinn treiben würden. Denn erst zum Abschluss meiner Häkelei bin ich auf das Star-Wars-Häkeln-Buch von Lucy Collin aufmerksam geworden, dass ich mir dann wohl zum nächsten Jahr gönnen werde, denn auf Ravelry sind die Pattern zugunsten der Buchveröffentlichung nicht mehr erhältlich.
Wer weiterliest, bekommt noch ein paar Bilder und die Anleitung zu Jabba und Boba (für die ich aber aufgrund der gebotenen Eile keine Garantie auf Vollständigkeit und Perfektion übernehmen werde).

Boba Fett
Please note: I cannot accept any guarantee of completeness or accuracy. I was in a hurry. But you are clever enough to correct my mistakes or to buy the double checked & published book by Lucy Collins.
My Boba Fett has several pieces. Two legs are joined together to form the body. The head includes a lot of colour changes. And I managed to write it down. Yeah! Some tiny bits are to be assembled to head too. And there is even a cloak.
Leg (make two)
Work in rounds
Rnd 1: dark grey – start 5 sc in a mr (5)
Rnd 2: inc 5 times (10)
Rnd 3: dc in all 10 (10)
Rnd 4: sc in all 10 (10)
Rnd 5: change to light grey – sc in all 10 (10)
Rnd 6+7: sc in all 10 (10)
Rnd 8: change to yellow – sc in all 10 (10)
Rnd 9: change to light grey – sc in all 10 (10)
Rnd 10+11: sc in all 10 (10)
Rnd 11: change to green – sc in all 10 (10)
FO the first leg and start all over again to make the second leg.
Rnd 12: join both legs together – with green yarn – by working 20 sc around (20)
Rnd 13-15: sc in all 20 (20)
Rnd 16+17: change to brown – sc in all 20 (20)
Rnd 20-23: change to green – sc in all 20 (20)
Rnd 24: *2 sc, dec* (15)
Rnd 25: *sc, dec* (10)
Rnd 26: dec 5 times (5)
FO, close cap & weave in tail.
Arm (make two)
Work in rounds
Rnd 1: start with light grey – 4 sc in a mr (4)
Rnd 2: *sc, inc* (6)
Rnd 3: sc in all 6 (6)
Rnd 4: change to red – *2 sc, inc* (8)
Rnd 5+6: sc in all 8 (8)
Rnd 7+8: change to light grey – sc in all 8 (8)
Rnd 9: *2 sc, dec* (6)
Rnd 10: change to yellow – sc in all 6 (6)
Rnd 11: dec 3 times (3)
FO & leave a long tail for sewing the arms to the body.
Head
Work in rounds
Rnd 1: start with green – 5 sc in a mr (5)
Rnd 2: inc 5 times (10)
Rnd 3: *sc, inc* (15)
Rnd 4: *2 sc, inc* (20)
Rnd 5: *3 sc, inc* (25)
Rnd 6: sc in all 25 (25)
Rnd 7: change to red – sc in next 12, change to green – sc in next 13 (25)
Rnd 8: change to red – sc in next st, change to black – sc in next 10, change to red – sc in next st, change to green – sc in next 13
Rnd 9: change to red – sc in next 12, change to green – sc in next 13 (25)
Rnd 10-12: stay green – sc in all 25 (25)
Rnd 13: change to light grey – *3 sc, dec* (20), at the end of the round 9 ch and sc back in the next 8 st, continue with next round.
Rnd 14: *2 sc, dec* (15)
Rnd 15: *sc, dec* (10)
Rnd 16: dec 5 times (5)
FO, close cap & leave a long tail to sew the head to the body.
Accessories
The face mask is made with two chains. One red (12 ch), one black (6 ch). Easy slinging, pinning, sewing to the head!
Work in rows to create left antenna
Rw 1: start with light grey – 10 ch (10)
Rw 2: change to black – 3 sc in 2nd ch from hook, change to light grey – sc in next 9, sl st in last ch (14)
FO, weave in black tail, leave a long light grey tail to sew the antenna to the head.
Cloak
Work in rows.
Rw 1: brown – 17 ch (17)
Rw 2: sc in next 15 starting with 2nd ch from hook (15)
Rw 3: ch, turn, sc in next 12 starting with 2nd ch from hook
Rw 4: ch, turn, sc in next 12 starting with 2nd ch from hook
Rw 5: ch, turn, sc in next 12 starting with 2nd ch from hook, 4 ch
Rw 6: turn, sc in next 15 starting with 2nd ch from hook
Rw 7: turn, sc in next 15 starting with 2nd ch from hook, 3 ch
Rw 8: turn, sc in next 17 starting with 2nd ch from hook
FO & leave a long tail to sew the cloak to the body.

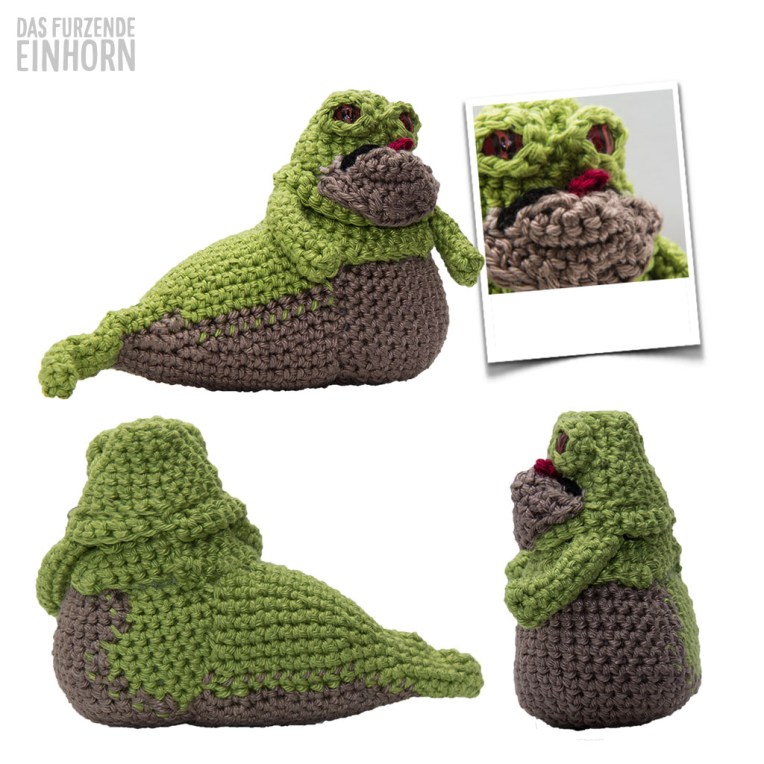
Jabba
Please note: I cannot accept any guarantee of completeness or accuracy. I was in a hurry. But you are clever enough to correct my mistakes!
The head has 6 pieces. Three layers build the head (A, B & C). One piece is the snout (D). And you need to work two eyepieces (E) to give him this fed up look. The eyes are painted safety eyes with red and orange nail colour post finished with black ink. The mouth needs to be embroidered with black yarn. The red tongue is worked in 3 ch and 3 sc in the second st from hook. Assemble all pieces and the arms before filling the head and sewing it to the body. It will take some time, but do not worry: it will be worth the effort.
Head A
Work in rounds, green yarn
Rnd 1: start 5 sc in a mr (5)
Rnd 2: inc 5 times (10)
Rnd 3: sc in all 10 (10)
Rnd 4: *sc, inc* (15)
Rnd 5: sc in all 15 (15)
Rnd 6: *2 sc, inc* (20)
Rnd 7: *3 sc, inc* (25)
Rnd 8-9: sc in all 25 (25)
FO & weave in tail.
Head B
Work in rounds after starting with 25 ch, green yarn
Rnd 1: close chains with sl st to form a circle, sc in all 25 (25)
Rnd 2: *4 sc, inc* (30)
FO & weave in tail.
Head C
Work in rounds after starting with 20 ch, green yarn
Rnd 1: close chains with sl st to form a circle, *3dc, inc* (25)
Rnd 2: *4 sc, inc* (30)
Rnd 3: *5 sc, inc* (35)
FO & weave in tail.
Eyes D (make two)
Work in rounds, green yarn. Do not close the MR to tight, you have to get the safety eye through.
Rnd 1: start 4 sc in a mr (4)
Rnd 2: inc 4 times (8)
Rnd 3: sc in all 8 (8)
FO & leave a long tail for sewing the eyes to the head (A).
Snout E
Work in rows with brown yarn, but start 4 sc in a mr (4), without closing the loop.
Rw 1: ch, turn, inc 4 times (8)
Rw 2: ch, turn, sc in all 8 (8)
Rw 3: ch, turn, sc in all 8 plus 4 ch (12)
Rw 4: turn, sc in next 3 (starting with 2nd from hook), dc in next 7, sc, 4 ch and work the next 3 st sc back (starting with 2nd from hook))
FO & leave a long tail for sewing the snout over the head (B + C).
Arm (make two)
Work in rounds, green yarn
Rnd 1: start 4 sc in a mr (4)
Rnd 2: inc 4 times (8)
Rnd 3-10: sc in all 8 (8)
FO & leave a long tail for sewing the arms between head layers (B + C).
The Body has 2 pieces – belly and tail. Stuff the pieces firmly as you go and before sewing them together or to the head. I wish I had written down the detailed colour changes, but you are on your own. Do as you like with a 2/3 green ratio. Just spin the belly part some times before assembling so your colour changes match.
Due to a lot of questions I added the chain number, where to with colours in {brackets}; start a new round always with green until other indication – Update August 2017
Belly
Work in rounds, start with green
Rnd 1: start 5 sc in a mr (5)
Rnd 2: inc 5 times (10)
Rnd 3: *sc, inc* (15)
Rnd 4: *2 sc, inc* (20) – start colour change and continue to change colours as you go
Rnd 5: *3 sc, inc* (25) {15}
Rnd 6: *4 sc, inc* (30) {18}
Rnd 7: *5 sc, inc* (35) {21}
Rnd 8: *6 sc, inc* (40) {24}
Rnd 9-14: sc in all 40 (40) {24}
Rnd 15: *6 sc, dec* (35) {21}
Rnd 16: progress in beige colour, leave out the colour you started with *6 sc, dec* (35)
Rnd 17: *5 sc, dec* (30)
Rnd 18: *4 sc, dec* (25)
Rnd 19: *3 sc, dec* (20)
Rnd 20: *2 sc, dec* (15)
Rnd 21: *sc, dec* (10)
Rnd 17: dec 5 times (5)
FO, close cap & weave in tail.
Tail
Work in rounds
Rnd 1: start 5 sc in a mr (5)
Rnd 2: sc in all 5 (5)
Rnd 3: sc, inc, sc, inc, sc (7)
Rnd 4: sc in all 7 (7)
Rnd 5: inc, 2 sc, inc, 2 sc, inc (10)
Rnd 6: sc in all 10 (10)
Rnd 7: *4 sc, inc* (12) {6}
Rnd 8: sc in all 12 (12) {6}
Rnd 9: *5 sc, inc* (14) {7}
Rnd 10: sc in all 14 (14) {7}
Rnd 11: inc, sc in all 13 (15) {8}
Rnd 12: *2 sc, inc* (20) {10}
Rnd 13: sc in all 20 (20) {10}
Rnd 14: *3 sc, inc* (25) {11}
Rnd 15: sc in all 25 (25) {11}
Rnd 16: *4 sc, inc* (30) {15}
Rnd 17: sc in all 30 (30) {15}
Rnd 18: *5 sc, inc* (35) {18}
Rnd 19+20: sc in all 35 (35) {18}
Rnd 21: *6 sc, inc* (40) {20}
Rnd 22: sc in all 40 (40) {20}
FO & leave a long tail of both colors for sewing the tail to the belly.

May the force be with you!
